|
|
Instructions

Step 1 – Modelling the Pipes
The basis for our pipes is an air-drying modelling compound. I use some from a crafting store, which is a mixture of pug and gesso. So it doesn't need heat as pug would need.
At first, you get yourself a nice piece of the compound and some drops of water and knead it as long as it is easy to form and handle. If you like, you can take gloves on such as I did, because I hate to have that stuff under my nails. First of all, I always do a smooth, even ball out of the mass. If necessary add water step by step, to get the material smooth enough for this.
Then just start to roll it, but try to keep one end of your roll thick, it will be our pipe bowl in the end. You can do the mouthpiece of the pipe as long, thick and thin as you want. Also you can form it in different ways. To get the surface plain, you can add some water and stroke the rips or uneven pieces out.
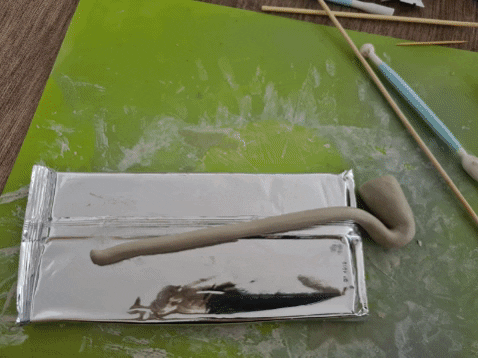 When your mouthpiece has the form you wanted, you can start to form the general shape and the pipe bowl. Here also you have no limits in shapes and so on. Just keep in mind that you need to form it in a way that can dry easily. Therefore, you also can and might use modelling tools. I didn't do some actual holes into the pipe bowl, because the form got lost easily, but if you want to you can add these of course, as well as any decoration you have in mind. When your mouthpiece has the form you wanted, you can start to form the general shape and the pipe bowl. Here also you have no limits in shapes and so on. Just keep in mind that you need to form it in a way that can dry easily. Therefore, you also can and might use modelling tools. I didn't do some actual holes into the pipe bowl, because the form got lost easily, but if you want to you can add these of course, as well as any decoration you have in mind.
Finally, when I am done with the decorations, I added a little "fake"-hole in the end of each mouthpiece with the spit of wood. When you finished your forms, you can leave them for at least 12 hours to dry, then turn them, to let them dry from the other side.
Step 2 – Painting
After your pipes have dried properly - the modelling compound gets much lighter and isn't that cold anymore - you can start to paint them. You can mix and use every colour of the palette of course, I just did sort of realistic pipes. One for example is kinda inspired by the hobbits, one by Aragorn and one is... just a pipe that rushed through my mind. You can use all of your fantasy and also try to do a replication of a movie pipe. Do whatever you like. Experiment, have fun. Such as I had. For a wooden optic I also didn't need to do much more than to paint uneven or a layer more there and then, so it has this "mixed" look. Also you can make something glow subtle, I did it with the short pipe. I firstly painted it black, let almost dry and then used green and overpainted the black. Of course, you can't cover black completely, but that's the cool thing about acrylic paint: You can get those effects with that, that the original colour shines through. I really like this pipe. For the last pipe I just mixed white, a very little bit of black and brown together to get that brownish grey. After I painted the whole pipe and let dry, I just did some fantasy adornments with black. And tadaaaa... a marvelous fantasy pipe! You can mix and use every colour of the palette of course, I just did sort of realistic pipes. One for example is kinda inspired by the hobbits, one by Aragorn and one is... just a pipe that rushed through my mind. You can use all of your fantasy and also try to do a replication of a movie pipe. Do whatever you like. Experiment, have fun. Such as I had. For a wooden optic I also didn't need to do much more than to paint uneven or a layer more there and then, so it has this "mixed" look. Also you can make something glow subtle, I did it with the short pipe. I firstly painted it black, let almost dry and then used green and overpainted the black. Of course, you can't cover black completely, but that's the cool thing about acrylic paint: You can get those effects with that, that the original colour shines through. I really like this pipe. For the last pipe I just mixed white, a very little bit of black and brown together to get that brownish grey. After I painted the whole pipe and let dry, I just did some fantasy adornments with black. And tadaaaa... a marvelous fantasy pipe!
Finally, I did paint a fake hole on top of the pipe bowl with red, orange and yellow in a messy mix when the colours were still wett. I didn't just want to make it grey like ash or so. So, I have permanently glowing pipes but I like it that way.
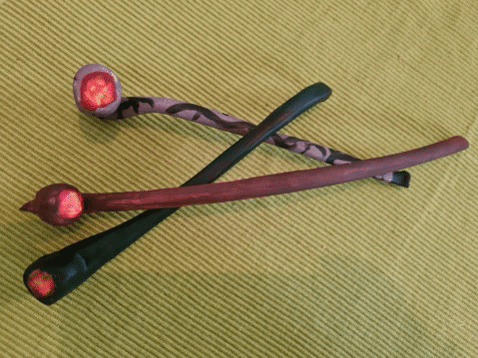
If you like, you can also coat the pipes with clear paint, but I didn't. Not for reasons of time, or I don't want to. The acrylic paint has a nice mix of being shiny and being a bit dull. The pipes look like as if they are in use and touched often, Just a very common, used item. I don't think that anyone thought "Oh I've got to polish my pipe!" while they were exploring Middle Earth, do you? ^_^
|
 Easy
Easy 1 h + 24 h
 10 €
10 €