 Easy
EasyLevel
 30 minutes
Working time
 10 €
10 €Average costs
|
Material
Stencil• printed motives • blue print • coloured sugar paper • pencil • a ruler • scalpel and • fine scissors The Candlelight • various glasses • coloured tissue paper • wallpaper glue or • décopatch glue • an old bristle brush • tweezers • double-sided tape • (electronic) candlelights |
Instructions
 Step 1 – Another Stencil 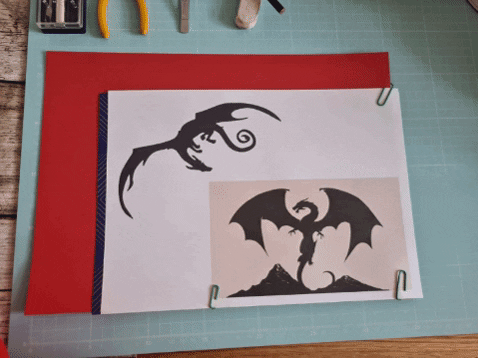 Those of you, who read my last blog, can skip that step after reading the title, but for our new crafter I know repeat how to make a stencil. You can either plot the motive on your sugar paper if you have a plotter or do it oldschool as I did this time: With blue print and a scalpel. Therefore, you have to choose and print your motive(s), which you then transfer onto the coloured paper of your choice. Make sure, the papers cannot move while transferring. I use paperclips to fix the layers. Reminder – The more detailed and smaller your motive is, the more difficult it is to cut by hand. Also keep in mind that your motive must fit into or onto the glass you're designing. When you've transferred your motive, release the paperclips. Depending on your motive you can use scissors or a scalpel, I usually use a scalpel because I can handle it better. By the way it is not necessary to throw awy the cut outs! Try not to slice them, I'll show you later why. Those of you, who read my last blog, can skip that step after reading the title, but for our new crafter I know repeat how to make a stencil. You can either plot the motive on your sugar paper if you have a plotter or do it oldschool as I did this time: With blue print and a scalpel. Therefore, you have to choose and print your motive(s), which you then transfer onto the coloured paper of your choice. Make sure, the papers cannot move while transferring. I use paperclips to fix the layers. Reminder – The more detailed and smaller your motive is, the more difficult it is to cut by hand. Also keep in mind that your motive must fit into or onto the glass you're designing. When you've transferred your motive, release the paperclips. Depending on your motive you can use scissors or a scalpel, I usually use a scalpel because I can handle it better. By the way it is not necessary to throw awy the cut outs! Try not to slice them, I'll show you later why.Step 2 – Glue and Tissue Paper When our stencil is finished, we can start with our glue. In this case I used wallpaper glue but I can highly recommend the so called decóptach glue. Pro of wallpaper glue is, that it is cheap and super easy to make but there are two disadvantages: you need to glace it so your candlelight becomes weatherproof. The decópatch glue is more expensive but it makes a wonderful shiny surface, sticks on nearly anything and is weatherproof, children- and food-safe! So a clear win win that's why I use it very often. At least you use both of them the same way and both of them have a medium slimy consistence and require bristle brushs which aren't for any other use. Before we start glueing anything you firstly should cut or rip some tissue paper, so you are all set to go. You can either use a whole piece and wrapp it around the glass accuartely or you can use many pieces and glue them wildly onto the glass. It is up to you to decide. Step 3 – Glue your stencil and the tissue  For different effects, you can glue the stencil from inside or outside. You'll see it will happen to appear differently, when the tissue paper is glued as well. You also can try to do a nice shadow effect. Therefore, you must choose a motive which you can form to a circle, I used the silhouette of Hogwarts for that, since the Fellowship is a bit to difficult without a plotter. I just added some centimetres of black paper to it and formed it to a circle, then I put it together with double-sided tape and created a little cross for more stability of my circle and glued it inside of my glass. The other motives I glued from the outside or inside onto the glass. For different effects, you can glue the stencil from inside or outside. You'll see it will happen to appear differently, when the tissue paper is glued as well. You also can try to do a nice shadow effect. Therefore, you must choose a motive which you can form to a circle, I used the silhouette of Hogwarts for that, since the Fellowship is a bit to difficult without a plotter. I just added some centimetres of black paper to it and formed it to a circle, then I put it together with double-sided tape and created a little cross for more stability of my circle and glued it inside of my glass. The other motives I glued from the outside or inside onto the glass.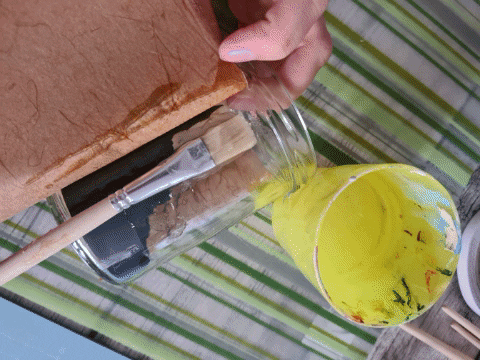 Before glueing anything by the way, you should make sure your upcycling glasses are clean! To place your motive right a pair of tweezers or a wooden stick can be helpful. Firstly, you put some glue on the glass, place the motive and then you take some more glue and put it over the motive as well so it soaks and sticks better. When you finished placing the motives you can start to attach the tissue paper. You do it the same way as you attach the motive: Firstly glue, paper, more glue. When you are finished, let them dry over night. I usually leave free the top of the glass, so I turn it around and just let it dry. Before glueing anything by the way, you should make sure your upcycling glasses are clean! To place your motive right a pair of tweezers or a wooden stick can be helpful. Firstly, you put some glue on the glass, place the motive and then you take some more glue and put it over the motive as well so it soaks and sticks better. When you finished placing the motives you can start to attach the tissue paper. You do it the same way as you attach the motive: Firstly glue, paper, more glue. When you are finished, let them dry over night. I usually leave free the top of the glass, so I turn it around and just let it dry.Step 4 – Final touch You can totally wrap the glass or you can leave the top free so you can prise the lids on and off. That of course depends on your light: If you use a real candle you can't use the lid. You also can wrap decorative bands around the top that's totally up to you! Only be aware to drape it that way that it cannot be burned or covers your beautiful motive.  A two other nice crafting things... If you have mixed a bit too much wall paper glue, you also can put some cling film over it, it keeps it also fresh. You just might add a bit more glue, so it gets stickier again. And do you remember my note on the silhouette from the beginning? Here I can reveal my absolute favourite glass! Which one is yours? 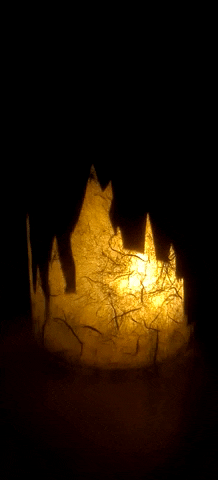 |