 Easy to Medium
Level
 30 minutes
Working time
 6 €
6 €Average costs
|
Material • cut motives • vinyl foil • transfer ribbon • tweezers • spiky tool • tumblers • old brush • etching paste |
Instructions  Step 1 – Chosing motives for your tumbler Depending on size and shape of your tumbler, you should decide wisely which motiv you might put on the glas for some reasons. Firstly, if the motive is too detailed, it might be quite difficult to get cut into a strencil, by hand and by a plotter! Secondly, the shape of your glass will have an influence as well. I chose some very beautiful glasses but the bellied form will make it very difficult to adjust the motives. 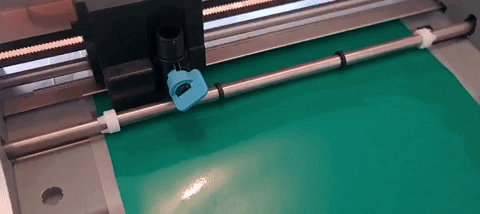 So, next to clean the glasses with soap and water and dry them carefully, you should measure the space for motives you have and then decide about your motives. You can do them yourself as I've shown you before or you can get them cut by a plotter (my new baby ^_^), which you can see here. So, next to clean the glasses with soap and water and dry them carefully, you should measure the space for motives you have and then decide about your motives. You can do them yourself as I've shown you before or you can get them cut by a plotter (my new baby ^_^), which you can see here.When you plot yourself, you have to carefully remove the foil which gives us the motive and will be covered by etching paste later. Therefore, use tweezers or other spiky and precise tools. Please be careful with your choice of glass. Super thin glass or glass you put under pressure such as some bottles, might not be used with etching paste! They might explode (I am actually not kidding), what makes it quite dangerous then. Step 2 – Transfer the stencil For our next step, take the transfer ribbon and place it on the top of the stencil. Before you carefully peel off the paper on the back from the stencil, make sure the whole stencil sticks to the transfer ribbon. Now the stencil is ready to be transferred, so now make sure your mirror (or glass, it is up to you to decide) is clean and dry. Then you can carefully position and transfer your stencil to the underground. Since we want the motive to be in the middle of our mirror, take your time before you place it on your mirror. Try to avoid folds and little bubbles, otherwise the etching paste will float under it and ruin your motive. Press the transfer ribbon and the stencil once again onto the mirror, then you can start to remove the ribbon. Be careful not to rip or peel off the stencil, especially the detailed pieces. Step 3 – Etching  So far we finished the difficult parts and now comes the easy stuff. Today, we're using etching paste. Be careful not to touch it or get it elsewhere, it might cause damage then! So far we finished the difficult parts and now comes the easy stuff. Today, we're using etching paste. Be careful not to touch it or get it elsewhere, it might cause damage then! For the etching paste you should use an older bristle brush, which cannot be ruined. Generously apply the paste onto the motive and try to avoid skin contact with the paste. When you’re done, wait 15 to 20 minutes. When the time is up, rinse the mirror or glass until every rest of the paste is washed away. Then you can peel off the stencil. If you want to use paint, you can use special glass colours here, some also mustn't be burnt in they just dry, use a softer brush or sponge and try not to water your colour too much, otherwise it will run elsewhere. Try to be as accurate as you can and apply the colour evenly. You can let it dry for some minutes, but you should start to peel off your stencil before it’s totally dry because otherwise the dry colour on the stencil will rip the colour from your motive. Final touch The tumblers are finished now and you can simply polish them with a towel and put them into a place where everyone can see them! The glasses are also put them into a dish washer, the motives are resistent and long lasting! Don't worry. I am totally in love. And you?  |